I love Rae's blog! She has such cute ideas. She's hosting a Spring Sew Along. Read the details here and join us!
|
I was looking up a couple of sewing terms, verifying the spelling, when I came across this site. I thought it might be a handy reference to anyone who sews.
If you have been following the "draft along", we have just finished our back pattern. This is such a good feeling! you'll be able to make garments that fit you!
Next week, we'll start on the front part. Stay tuned! Taking accurate measurements is important to making clothes that fit.
There are plenty of sites that show you how to do that, so i'm not going to re-write it. Instead, I'll post some links below: Sew Mama Sew Debutante Clothing has a video here Modern Pattern Design has more detailed instructions. Keep in mind that this was modern in 1942. This page is a little scary, as they make it look more complicated than it needs to be. However, it's very detailed and if you just take it one line at a time, it is very helpful. Rolling a nice, even hem takes some practice. Making such a hem on a curve, takes more practice and I have a little trick that I find useful. I run a basting line close to the edge, then pull it a little to make it gather slightly. This allows to "curl the fabric" to create an evenly rolled hem. Below are some quick photos to demonstrate. Click on a photo for a larger picture. Machine sew, taking out the pins just before the machine gets to it. Go slowly. This method does not require a special foot or attachment. 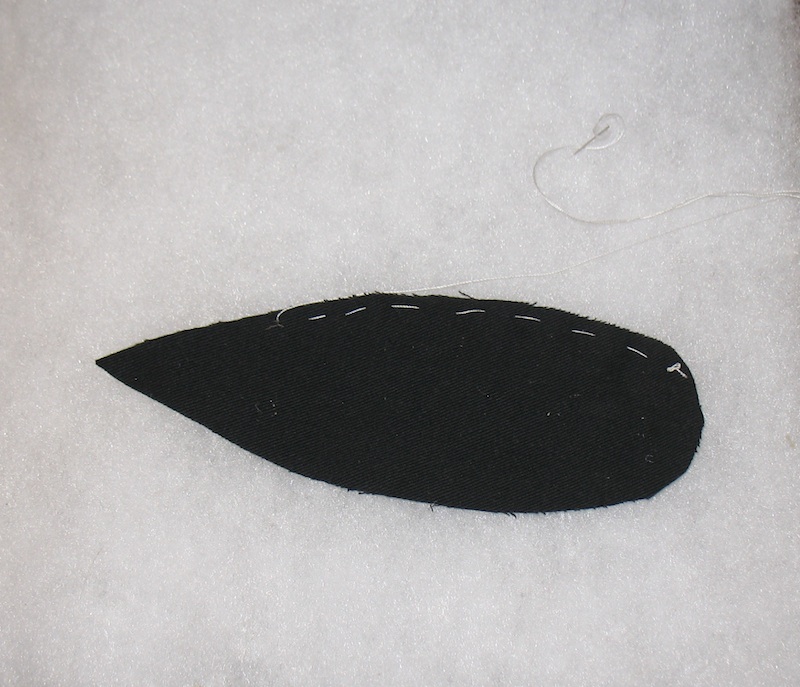  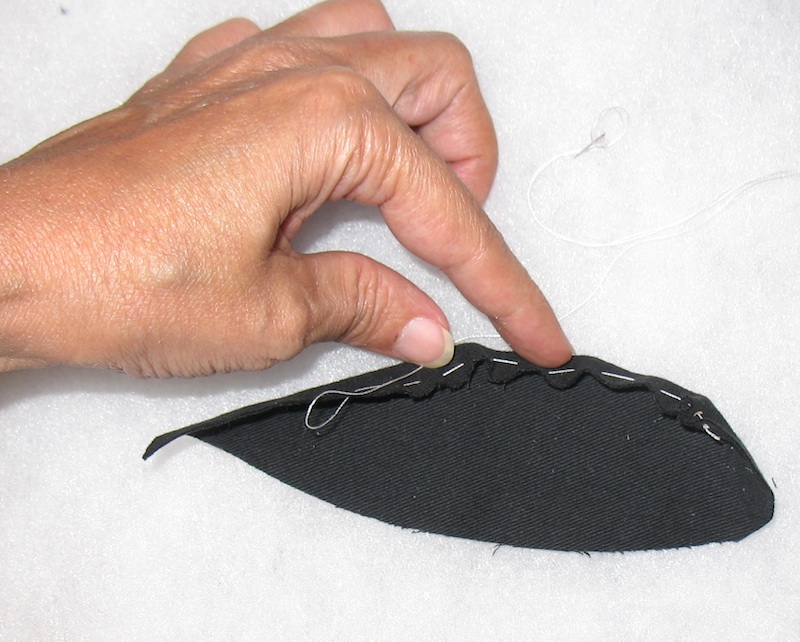 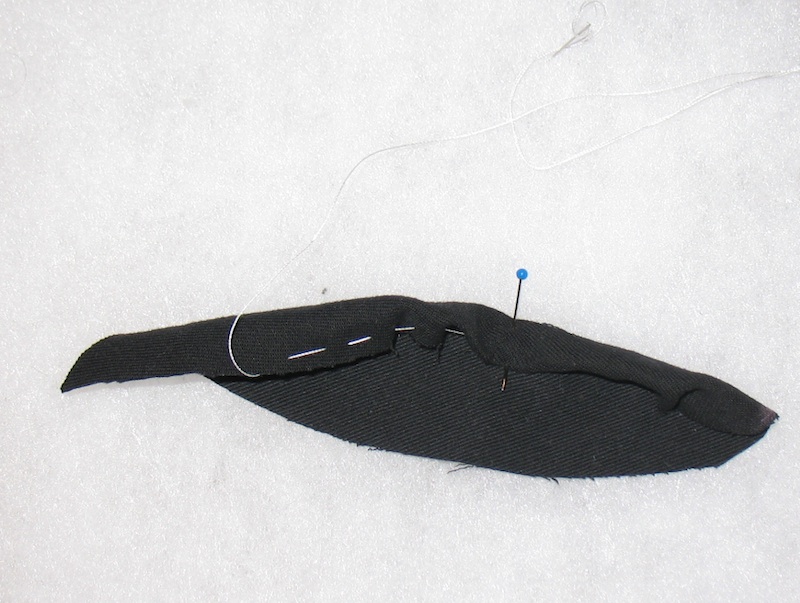  Next thing we need for the draft along are your measurements. I know, obvious, but I thought I'd go over which ones are needed.
One thing to note: when making a sloper, you want to take precise measurements, without any ease added. The following are needed: Bust: Taken at the largest point. Make sure the tape measure in straight across your back. Don't pull it tight, but it should be fairly snug. Also, calculate 1/4 of that measurement. Waist: Taken at the natural waist. I recommend tying a ribbon or string around your waist. Also, calculate 1/4 and 1/10th of that measurement. Back Length: This might require a helper. Taken from the base of your neck to your natural waist. Side length 1: From your waist to below the arm. The waist ribbon helps and it might help to tie another ribbon around your, right under the arms. Side length 2: From the ribbon below your arms to the shoulder. Do not curve the measuring tape, keep it in a straight vertical line. Shoulder: From the base of your neck to the point of the shoulder. If you have a significant difference between your left half and your right half (most people's shoulders are not exactly at the same height, but it's usually a slight difference), then you should take measurements on each side, label them as such, and make a separate sloper for each side. Remember, this is to fit you! Any questions specific to you, feel free to send me a private message or email. I think that's all. "See" you on Saturday! Have you ever been interested in learning how to draft your own garment patterns?
Are you frustrated by commercial patterns that just do not fit you? If you can trace a line on paper, you can easily learn how to make a basic pattern that fits you exactly. This basic pattern is called a sloper, at least in the USA. From it, you can there make modifications for different styles. I'm going to show you how easy it is. We'll start with a bodice sloper, which will be the base for blouses, tops, and the top part of dresses. If you're interested, please join me on Saturday, April 9th, 2011. Several members of My Sewing Circle are going to draft with me. It's free, by the way! Things to have on hand for the draft along: I must warn you, I am big on using what's available, not necessarily in investing in expensive, industry-specific supplies. Rulers: As long as it's straight, ideally 24" or 60cm long. A shorter ruler can be used, I have done it with a 12"/30 cm ruler, it just makes it a tad more difficult. Right Angle: If you don't have a square, L ruler, or T ruler, you can use some inexpensive school drafting squares. That's what I use, and it only requires a little more patience. Curved rulers: If you don't have a set of french curves (I don't), you can either hand draw like I do, or if that sounds scary, use a flexible ruler. Any flexible items that will retain the shape and spring back to a straight can be used. Incidentally, those are also used in woodworking, architecture, and drawing fields. Paper: Any paper can be used. Ideally, big enough to cover half your front. Something 24"/60cm wide will work for most people. Paper can also be taped to make it larger. I've made patterns using old newspapers (and gotten my hands all black in the days when they bled), plain printer paper, brown grocery bags... Fancy is not needed, unless you want to buy patterning paper. Paper preparation: If you use paper that doesn't stay flat too well, set it flat somewhere, stack some books on it. You can even iron it lightly if needed. Marking tools: Have a couple of pencils ready and sharp, finer point allows for more precise drafting but it harder to see (if your eyesight is bad like mine). I also like to have fine markers to retrace once I'm happy with the pattern. Finally, I like a large marker to label the pieces. Weights: Anything heavy will work as long as: The objects are small enough to fit on the pattern pieces without hindering your view and tracing. The objects are stable (nothing that will roll off). I also recommend nothing breakable, it's easy to accidentally elbow that candy dish right off the table. I have used canned good, rocks (my husband collects fossils - we have tons of rocks in various shapes), bricks, large upholstery scissors, candles. I also recommend a table or flat surface where you can spread out the paper and your tools. I'm sure you all have all these round the house. Don't forget to raid the kids' school supplies LOL! Please feel free to ask questions add insight, or make any comments. Stay tuned for my next post: Measurements you'll need. Don't worry, only you need to know what they are ;). 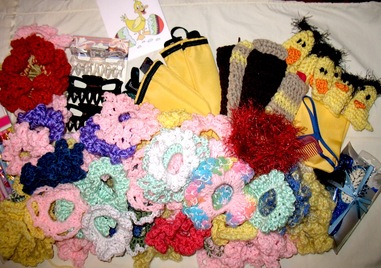 I belong to an awesome Yahoo group, and we decided to craft some things to benefit the children of the Pine Ridge Reservation. The project started as: "Let's make some hair scrunchies for the girls and send some combs for the boys!" Everyone was very enthusiastic and we all started looking at patterns. We all went through our Spring color yarns.
Hair scrunchies can be made in minutes. Most only require a couple of rows of crochet. Check out the patterns that Suzie, the group owner has published for this project! Click here, here, and here for some ideas. After purchasing some hair elastics and combs, I suggested that just sending combs for the boys did not feel like sending them a gift. Some of us decided to make pouches for the combs. I made a few in crochet, but I was not very happy with them. Mainly, they had to be oversized, so the teeth of the combs would not catch as you slid the comb in or out of the pouch. I then turned to sewing and some sturdy Sunbrella yellow fabric. Somewhere along the line, someone mentioned finger puppets and other small Easter gifts. I ended up with about 50 scrunchies of various colors, sizes, and designs. I added several finger duck puppets, a cute brush & comb set, some pencils, some hair "claws" (maybe for the older girls?), and some small treasures pouches (possibly some little boys would have a rock collection to keep in there). This was an exciting project. There was no getting bored, as each scrunchie could be made in a different pattern, with different yarns and colors. A few more photos can be seen here. If you would like to learn more about the Pine Ridge Reservation, click here. Well, after 6 weeks of sewing and crocheting (that's a word, right?), I've got a cute wardrobe to send to the babies in Haiti. Check out the photo gallery, Page 2. Click here to see it!
I always love to make tiny outfits. This project was even more fun for me:
So now, all those have been washed, inspected for stray threads and pins, and I'm waiting for the last items to finish drying. Got to find a large box to send them off. Enjoy little ones! |
Agnes teachesA blog to teach, learn, and share. Brought to from South Florida. Categories
All
Blogs I like
 |
 RSS Feed

